Picture this: it’s a warm summer afternoon, and your kids are bouncing off the walls with energy. What if I told you there’s a perfect project that combines family bonding, teaches valuable business skills, and creates lasting memories? Learning how to build diy lemonade stand is exactly that magical combination!
In this comprehensive guide, you’ll discover how to create a sturdy, functional, and completely customizable lemonade stand that’ll be the envy of the neighborhood. We’re not talking about flimsy cardboard contraptions here – you’re getting plans for a real, lasting structure that can handle everything from summer storms to enthusiastic young entrepreneurs.
What makes our approach unique? We focus on adaptability, durability, and simplicity. Whether you’re a seasoned DIYer or someone who’s never picked up a drill, this guide breaks everything down into manageable steps with practical tips you won’t find elsewhere.
Table of Contents

Why Build Your Own Lemonade Stand?
Before we dive into the nuts and bolts, let’s talk about why creating your own stand beats buying a pre-made kit every single time.
It’s an Amazing Family Project There’s something magical about working with your hands alongside your kids. When you build a DIY lemonade stand together, you’re not just creating a business – you’re creating memories. I’ve seen families bond over measuring twice, cutting once, and celebrating those perfectly aligned joints.
Real-World Business Education Want to teach your kids about money, customer service, and entrepreneurship? A homemade lemonade stand is business school in your backyard. They’ll learn about costs, profits, and the satisfaction of earning their own money through hard work.
Perfect Summer Activity Forget expensive summer camps – this project keeps kids engaged for days. From planning and building to decorating and operating, it’s entertainment that actually builds skills.
Customization Freedom Store-bought kits look like everyone else’s. When you learn how to build a DIY lemonade stand, you’re creating something unique that reflects your family’s personality and style.
Built to Last Those flimsy store kits fall apart after one season. A properly built DIY stand can last for years, serving multiple children and even becoming a neighborhood landmark.
Design Philosophy: Our “Adaptable Basic” Stand
Our approach centers on what I call the “Adaptable Basic” design. This isn’t just about following plans – it’s about creating a foundation that works for any family, any space, and any style.
Simple and Sturdy We use straightforward construction techniques that don’t require advanced carpentry skills. Every joint is designed for strength, ensuring your stand won’t wobble when excited customers lean against it.
Theme-Flexible Design The beauty of this design is its chameleon-like adaptability. Want a vintage carnival look? Easy. Prefer modern minimalist? No problem. Rustic farmhouse? Absolutely. The basic structure supports any aesthetic direction you choose.
Scalable for Your Space Whether you’re working with a small apartment balcony or a sprawling suburban yard, these plans can be adjusted to fit your space perfectly.
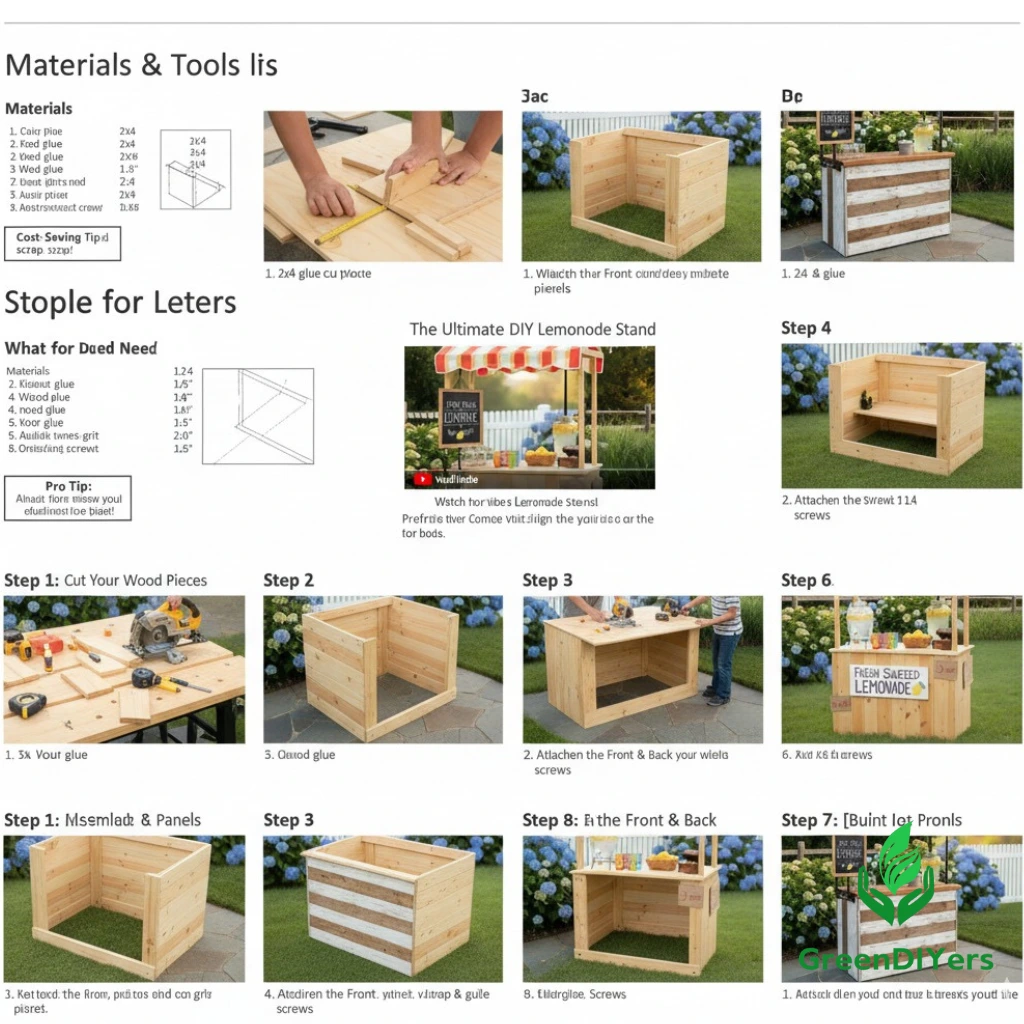
What You’ll Need: Materials
Getting your materials right is crucial for a successful build. Here’s your complete shopping list:
Wood Materials:
- 2 pieces of 1×4 pine lumber (8 feet long) for the frame
- 1 piece of 1×6 pine lumber (6 feet long) for the countertop
- 2 pieces of 1×3 pine lumber (8 feet long) for supports
- 1 piece of plywood (2×2 feet, ¼ inch thick) for the back panel
- 4 pieces of 2×2 lumber (4 feet long) for corner posts
Fasteners and Hardware:
- Wood screws (2½ inch and 1¼ inch)
- Wood glue
- Corner brackets (optional for extra strength)
- Hinges (if adding fold-down features)
Optional Finishing Materials:
- Primer and paint or wood stain
- Sandpaper (120 and 220 grit)
- Weather sealant for outdoor use
Pro Tip: Your local home improvement store often has a scrap wood section where you can find perfect pieces at fraction of the cost. Don’t overlook this goldmine – some of my best builds have started with “leftover” lumber that was exactly what I needed.
Tools for the Job
Having the right tools makes this project smooth and enjoyable:
Essential Tools:
- Measuring tape
- Circular saw or miter saw
- Power drill with bits
- Level
- Clamps (at least 4)
- Random orbital sander
- Pencil for marking
- Safety glasses and ear protection
Nice-to-Have Tools:
- Router for rounded edges
- Pocket hole jig for cleaner joints
- Brad nailer for quick assembly
Safety First: Adult supervision is non-negotiable when power tools are involved. Even if your kids are “helping,” they should be well clear of cutting and drilling operations. Safety glasses aren’t optional – they’re essential for everyone in the work area.
how to build diy lemonade stand
Seeing the entire process in action makes everything clearer. Our step-by-step video walks you through every cut, every joint, and every trick we’ve learned from building dozens of these stands.
Let’s Build It! Step-by-Step Instructions
Now for the main event – actually building your lemonade stand. We’ll take this one step at a time, ensuring you understand not just what to do, but why we’re doing it.
Step 1: Gather & Cut Your Wood
Start by laying out all your materials and double-checking your cut list. Measure twice, cut once – this old carpenter’s adage will save you time and materials.
Cut your frame pieces first:
- 4 pieces at 24 inches for the front and back frame
- 4 pieces at 18 inches for the side frames
- 1 piece at 30 inches for the countertop support
Pro Tip: If you’re uncomfortable with power saws, most lumber yards will make these cuts for you for a small fee. It’s worth it for accuracy and safety.
Step 2: Assemble the Side Panels
This is where your lemonade stand starts taking shape. Create two identical side panels by connecting your 24-inch and 18-inch pieces into rectangles.
Apply wood glue to the joints before screwing them together. The glue provides long-term strength, while the screws provide immediate holding power. Clamp everything square and let the glue set for at least 30 minutes.
Step 3: Connect the Front & Back Panels
With your side panels ready, it’s time to create the main structure. The back panel gets the plywood backing for stability and weather protection.
Position your corner posts and attach the side panels. This step requires patience – having a helper makes it much easier. Use your level constantly to ensure everything stays square.
Step 4: Add the Countertop
The countertop is where the magic happens – it’s your serving surface and the focal point of the whole stand. Sand it smooth and round over the edges slightly for safety and professional appearance.
Attach it securely to the frame, making sure it overhangs slightly on the customer side. This overhang provides a comfortable leaning space and gives your stand a more substantial look.
Step 5: Construct the Awning Supports
An awning isn’t just decorative – it protects your young entrepreneurs from sun and light rain. Create angled supports that extend about 12 inches from the front of the stand.
The angle is crucial here. Too steep and rain will run back onto the stand; too shallow and it won’t provide adequate shade. Aim for about a 15-degree downward slope.
Step 6: Create & Attach the Awning (Optional)
For the awning itself, you have several options. Canvas provides the most professional look and best weather protection. Colorful fabric gives you unlimited design possibilities. Even a simple tarp can work if you’re going for function over form.
Attach the awning material securely to both the main structure and the support arms. Consider adding grommets and rope ties for easy removal and cleaning.
Step 7: Finishing Touches & Decoration
This is where your stand transforms from a wooden box into a neighborhood attraction. Sand everything smooth, starting with 120-grit and finishing with 220-grit sandpaper.
Prime and paint using weather-resistant exterior paint. Two thin coats always look better than one thick coat. Let each coat dry completely before applying the next.

Make It Your Own: Customization & Decoration Ideas
Now comes the fun part – making this lemonade stand uniquely yours. Here are some tried-and-true themes that never fail to attract customers:
Classic Lemonade Stand
Go traditional with red and white stripes, vintage-style lettering, and maybe some bunting. This timeless look appeals to all ages and photographs beautifully for those social media moments.
Add a hand-painted sign with playful lettering. Consider chalk paint for the price board – it’s functional and adds to the authentic feel.
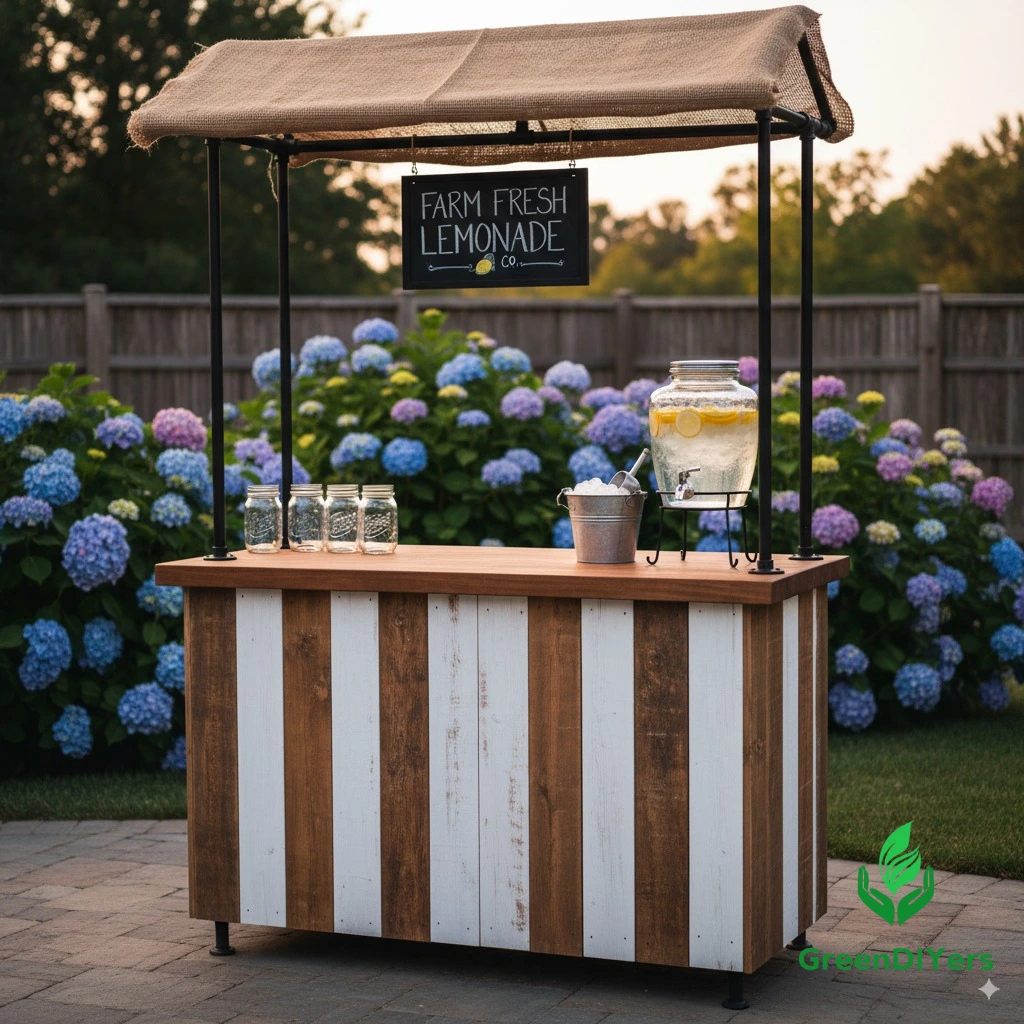
Rustic Farmhouse
Skip the paint and embrace the natural wood with a weathered stain. Add some mason jar holders, burlap accents, and maybe a small chalkboard menu. This style works especially well if you’re selling farm-fresh lemonade made with local ingredients.
Distress the edges lightly with sandpaper for that authentic worn look. A galvanized metal pitcher as a decorative element ties the whole theme together.
Modern Minimalist
Clean lines, bold colors, and simple graphics create a stand that looks like it belongs at a design festival. Think bright whites with one accent color, geometric patterns, and sleek signage.
This style works particularly well in urban settings and attracts the Instagram crowd.
Theme Stands: Beyond Lemonade
Who says you’re limited to lemonade? This same basic structure works perfectly for:
- Hot cocoa stands in fall and winter
- Bake sale booths for school fundraisers
- Art supply stations for outdoor craft sessions
- Book lending libraries
- Neighborhood information kiosks
The adaptability of this design means you’re building something that’ll serve your family for years in various capacities.
Final Thoughts: More Than Just a Stand
Learning how to build a DIY lemonade stand is about so much more than the final product. It’s about working together, solving problems, and creating something with your own hands. It’s about teaching kids that they can build solutions to problems and that entrepreneurship starts with taking action.
Every family that builds one of these stands tells me the same thing: the conversations that happen during construction are just as valuable as the business lessons that come later. You’ll find yourself talking about everything from geometry (why squares are important) to economics (pricing strategies) to customer service (how a smile increases sales).
The stand you build this summer might serve lemonade for just a few months, but the lessons learned and memories made will last a lifetime. And when your kids are grown and teaching their own children how to build a DIY lemonade stand, you’ll know you’ve built something truly worthwhile.
So grab your tools, gather your materials, and get ready to create something amazing. Your neighborhood’s most popular summer destination starts with that first cut of wood.