Have you ever wondered what it would feel like to conjure your very own Patronus? That shimmering, protective guardian that chases away the darkest fears and fills your heart with hope? While we might not have actual wands (yet!), I’m here to show you how to create DIY Patronus from Harry Potter that’ll bring that magical feeling right into your home.
In the wizarding world, a Patronus serves as the ultimate magical defense against Dementors. These silvery guardians take the form of animals that hold special meaning to each witch or wizard. But here’s the beautiful thing about DIY crafting – you don’t need to wait for your Hogwarts letter to create something truly magical.
This guide offers multiple enchanting craft projects perfect for Harry Potter fans of all ages and skill levels. Whether you’re a beginner looking for simple painted stones or an intermediate crafter ready to tackle glowing lanterns, I’ve got you covered. Each project captures that ethereal, protective spirit of a Patronus while being completely achievable with everyday materials.
Ready to discover your inner magic? Let’s dive into the wonderful world of DIY Patronus crafting!
Table of Contents
Understanding Your Patronus: A Quick Dive into the Lore
Before we start crafting, let’s explore what makes a Patronus so special. In J.K. Rowling’s magical universe, Patronuses are conjured through the spell “Expecto Patronum” and powered by happy memories. These silvery guardians can take two forms: incorporeal (a simple silver shield) or corporeal (a fully-formed animal).
The animal form of your Patronus reflects your innermost nature and often changes throughout your life as you grow and evolve. From Harry’s majestic stag to Luna’s graceful hare, each Patronus tells a unique story about its caster.
What do you think your Patronus would be? As you work through these projects, consider which animal speaks to your soul. Maybe it’s a fierce wolf, a wise owl, or perhaps something completely unexpected like a playful otter!
Essential Supplies for Your DIY Patronus Journey
Before we begin our magical crafting adventure, let’s gather our “spell components.” Most of these materials are craft store staples, making it easy to start your DIY Patronus from Harry Potter project right away:
Basic Craft Arsenal:
- LED string lights or tea lights (battery-operated)
- Mason jars in various sizes
- Acrylic paints (silver, white, blue, purple)
- Paintbrushes (various sizes)
- Cardstock and construction paper
- Glue sticks and craft glue
- Scissors and craft knife
- Pencil and eraser
- Frosting spray or glass paint
- Clear ornament balls
- Smooth stones or wood slices
- Metallic markers
- Glitter (optional, but who doesn’t love sparkle?)
Pro tip: Start with one project and build your supply collection over time. You’ll be amazed how these materials can be mixed and matched for endless Patronus possibilities!
DIY Patronus Project 1: The Ethereal Glowing Jar Lantern (Beginner/Intermediate)
Crafting Your Luminous Guardian: The Glowing Patronus Jar Lantern
This stunning project creates a mesmerizing glow that perfectly captures the ethereal nature of a Patronus. When you learn how to create DIY Patronus from Harry Potter with this technique, you’ll have a magical nightlight that would make even Professor Lupin proud!
Why this project rocks: It’s absolutely gorgeous in low light, creates ambient mood lighting, and makes an incredible gift for any Potter fan.
Materials Needed:
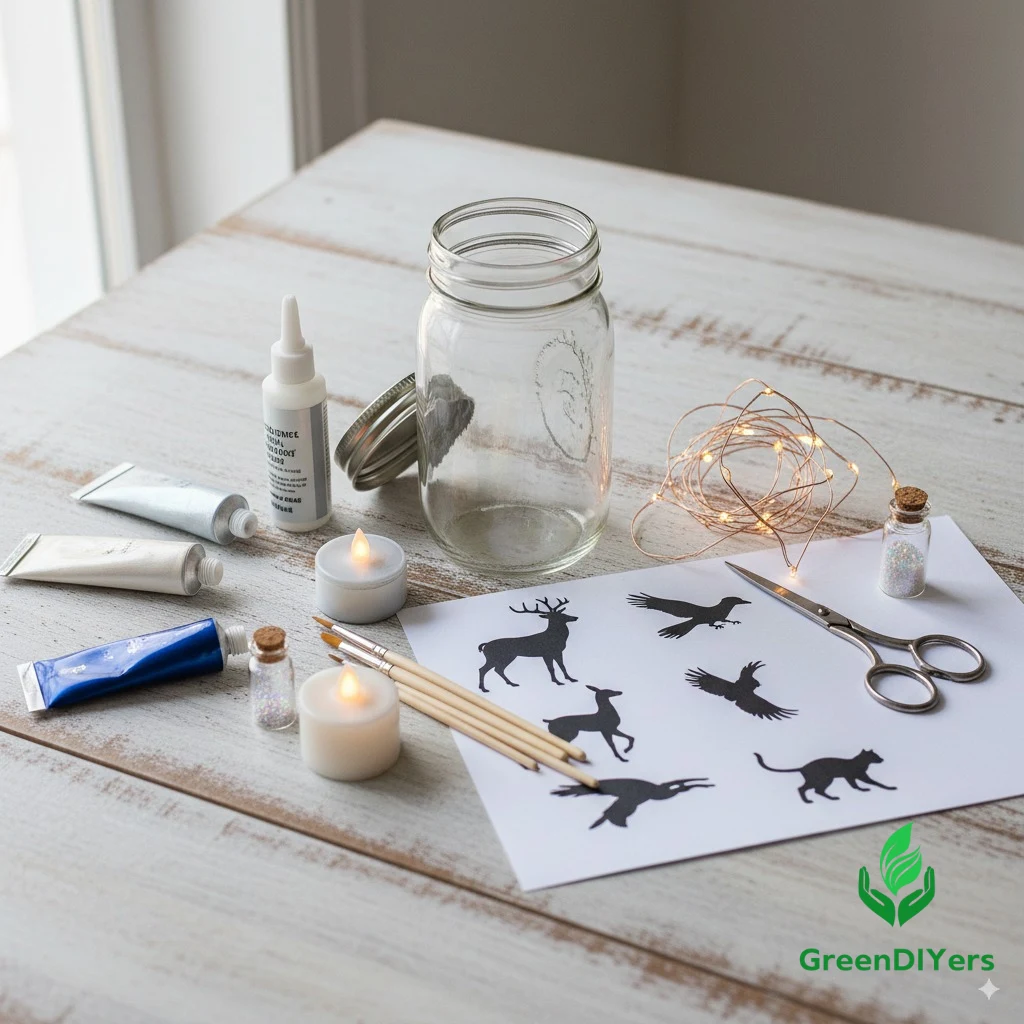
- Large mason jar (32 oz works beautifully)
- Battery-operated LED string lights (warm white or cool white)
- Frosting spray or glass frosting medium
- Animal silhouette template (printed or drawn)
- Vinyl stickers or painter’s tape
- Protective newspaper/cardboard
Step-by-Step Instructions:
- Prepare your workspace by laying down newspaper and ensuring good ventilation.
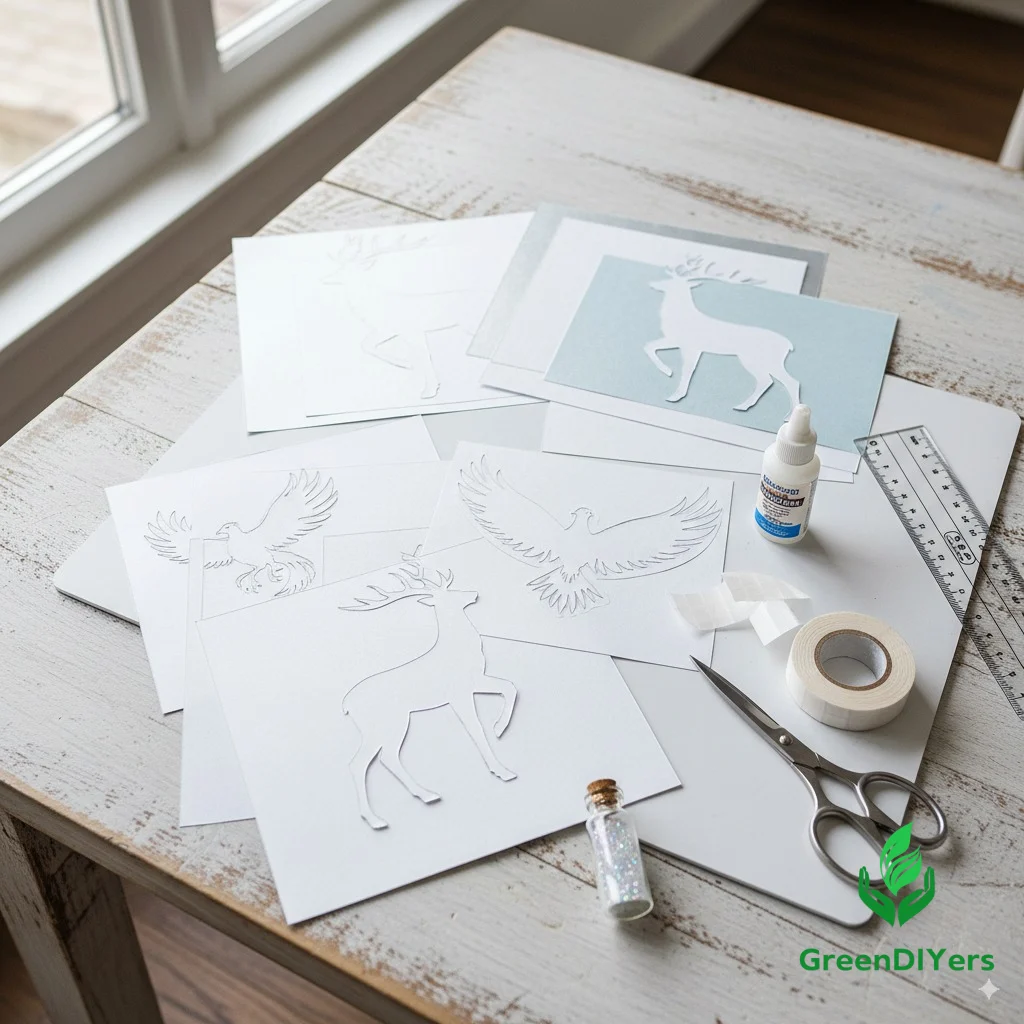
- Choose and prepare your animal silhouette. Print your chosen Patronus animal (stag, doe, wolf, etc.) and cut it out to create a stencil.
- Apply your stencil to the jar using vinyl stickers or carefully placed painter’s tape. Press down firmly to prevent paint bleeding.
- Apply frosting spray in light, even coats, holding the can 8-10 inches away. Build up the opacity gradually with 2-3 thin coats rather than one thick application.
- Let dry completely (about 30 minutes) before carefully removing your stencil.
- Add your lights by threading the LED string inside the jar, ensuring the battery pack stays outside for easy access.
- Test your creation in a dark room – watch as your Patronus silhouette glows against the ethereal frosted background!
The result? A hauntingly beautiful luminary that casts magical shadows and fills any room with Patronus energy.
DIY Patronus Project 2: Personalized Paper & Cardstock Sculpture (Intermediate)
Bringing Your Patronus to Life: 3D Paper & Cardstock Art
Ready to take your DIY Patronus from Harry Potter skills to the next level? This dimensional sculpture creates a stunning centerpiece that seems to leap right off your shelf.
Why this project is amazing: It’s completely customizable, requires no special tools, and creates impressive results that look way more complicated than they actually are.
Materials Needed:
- Heavy cardstock (white, silver, or light blue)
- Craft knife and cutting mat
- Bone folder or ruler (for crisp creases)
- Strong craft glue or double-sided tape
- LED tea light or small spotlight
- Animal template (multi-layered design)
- Pencil for light sketching
Step-by-Step Instructions:
- Design your layers. Break your chosen animal into 3-4 depth layers (background, mid-ground, foreground details). A stag might have: antlers, head/neck, body, and legs as separate layers.
- Transfer and cut each layer onto cardstock, making the background layer largest and foreground smallest.
- Score and fold connection points where pieces will attach, creating natural dimension.
- Assemble from back to front, using small tabs of cardstock as spacers between layers (about ¼ inch apart).
- Position your lighting behind or beneath the sculpture to create that signature Patronus glow.
- Fine-tune the positioning until you achieve the perfect ethereal shadow play.
This technique creates incredible depth and movement, especially when the light source moves slightly – just like a real Patronus!
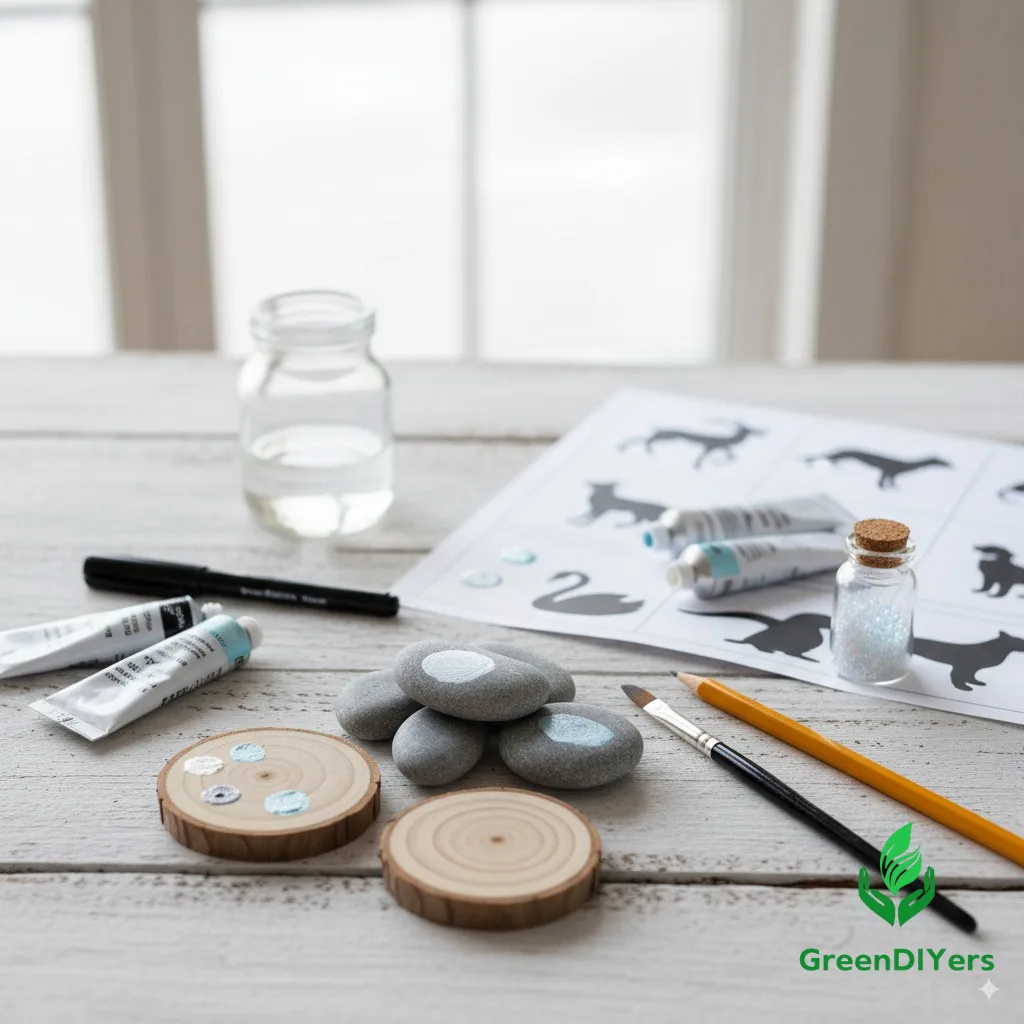
DIY Patronus Project 3: Simple Painted Stone/Wood Slice (Beginner/Kids)
Mini Magical Guardians: Painted Patronus Stones or Wood Slices
Sometimes the most powerful magic comes in small packages. These adorable mini Patronuses are perfect for beginners and young crafters who want to learn how to create DIY Patronus from Harry Potter with minimal fuss and maximum fun.
Why kids (and adults!) love this project: Quick results, no special skills needed, perfect for group crafting, and incredibly portable magic.
Materials Needed:
- Smooth river rocks or wood slices (2-4 inches)
- Acrylic paints (white, silver, light blue)
- Fine-tip brushes
- Black permanent marker
- Clear sealant spray
- Paper towels
- Water container
Step-by-Step Instructions:
- Clean your surface thoroughly and let dry completely.
- Base coat with white or very light blue paint. Let dry for 15 minutes.
- Sketch your animal lightly with pencil – keep it simple! Think silhouette rather than detailed features.
- Paint your Patronus using silver or white paint, building up opacity with multiple thin coats.
- Add defining details with a black marker once paint is completely dry.
- Seal your creation with clear spray to protect against wear.
- Display proudly on your desk, bookshelf, or carry as a pocket-sized guardian!
Pro tip: Create a whole collection of different animals for friends and family – imagine gifting everyone their personal Patronus stone!
DIY Patronus Project 4: The Elevated Ornament (Outdoing the Competitor!)
Beyond the Christmas Tree: Your Custom Patronus Ornament
Why limit magical decorations to December? These stunning Patronus ornaments bring year-round enchantment and showcase advanced techniques for creating DIY Patronus from Harry Potter keepsakes.
The concept: Multi-style ornaments that capture different aspects of Patronus magic – from delicate glass spheres to layered dimensional pieces.
Option A: Frosted Glass Ball Ornament
Materials:
- Clear glass ornaments (various sizes)
- Frosting medium or etching cream
- Animal vinyl stickers
- LED micro-lights (optional)
- Ribbon for hanging
Instructions:
- Apply your animal stencil to the clean ornament surface.
- Carefully apply frosting medium following manufacturer’s directions.
- Remove stencil while medium is still tacky for clean lines.
- Add micro-lights inside for extra glow.
- Finish with decorative ribbon in house colors.
Option B: Layered Wood or Acrylic Ornament
Materials:
- Laser-cut wood/acrylic pieces (or hand-cut templates)
- Wood stain or acrylic paint
- Strong adhesive
- Drill and small bit for hanging hole
- Sandpaper for smooth edges
Instructions:
- Sand all pieces smooth and clean thoroughly.
- Stain or paint each layer, allowing full drying time.
- Assemble layers with small spacers for dimension.
- Drill hanging hole and add cord or chain.
- Display anywhere magical ambiance is needed!
Both styles create ornaments that work beautifully year-round, not just during holidays.
Advanced Patronus Crafting Ideas & Variations
Ready to push your DIY Patronus from Harry Potter skills even further? Here are some advanced project ideas for experienced crafters:
Shadow Box Scenes: Create dimensional dioramas showing your Patronus in action, complete with miniature Dementors fleeing in the background.
Embroidered Guardians: Hand-stitch or machine-embroider Patronuses onto clothing, bags, or wall hangings using metallic threads for that signature shimmer.
Clay Sculptures: Work with polymer clay to create detailed, paintable figurines that can be illuminated from within.
Digital Integration: Combine crafting with technology by creating QR codes that link to Patronus-related audio or video content.
Wearable Magic: Design jewelry pieces featuring small Patronus charms that catch and reflect light throughout the day.
Each of these projects offers unique challenges and incredibly rewarding results for dedicated crafters.
Troubleshooting & Tips for Magical Results
Even the most experienced crafters sometimes face challenges. Here are solutions to common issues when learning how to create DIY Patronus from Harry Potter projects:
Problem: Paint bleeding under stencils Solution: Use less paint per coat and ensure stencils are firmly pressed down. Remove while paint is still slightly wet.
Problem: LED lights too harsh or bright Solution: Diffuse with tissue paper or choose warm white over cool white. Battery-operated lights offer better control than plug-in versions.
Problem: Proportions look off Solution: Step back frequently during creation. Sometimes projects look different up close versus at viewing distance.
Problem: Running out of specific materials Solution: Embrace creative substitutions! Purple tissue paper can substitute for expensive frosting spray, and aluminum foil creates beautiful metallic effects.
Remember: The most important ingredient in any Patronus craft is the happy memory you create while making it!
Share Your Magic! (Call to Action & Conclusion)
Congratulations! You’ve now learned multiple ways how to create DIY Patronus from Harry Potter crafts that would impress even the professors at Hogwarts. From glowing lanterns that light up dark corners to delicate ornaments that catch morning sunlight, you’ve mastered the art of bringing protective magic into the real world.
Each project in this guide offers something special – whether you’re crafting with kids, creating gifts for fellow fans, or simply wanting to surround yourself with magical energy. The beauty of DIY Patronus crafting lies not just in the finished pieces, but in the joy and creativity you pour into every step.
Ready to share your magical creations? I’d love to see your Patronus projects! Share photos on social media using #DIYPatronusChallenge and tag your fellow crafters. There’s nothing quite like a community of creators inspiring each other with new ideas and techniques.
Remember, just like in the wizarding world, the most powerful Patronuses come from the heart. So grab your supplies, summon your happiest memories, and start creating magic that will chase away darkness and bring light to every corner of your world.
Your Patronus is waiting – will you answer the call?
Expecto Patronum! 🦌✨