27 Cool Crafts for Teens They’ll Actually Want to Make in 2026

Table of Contents
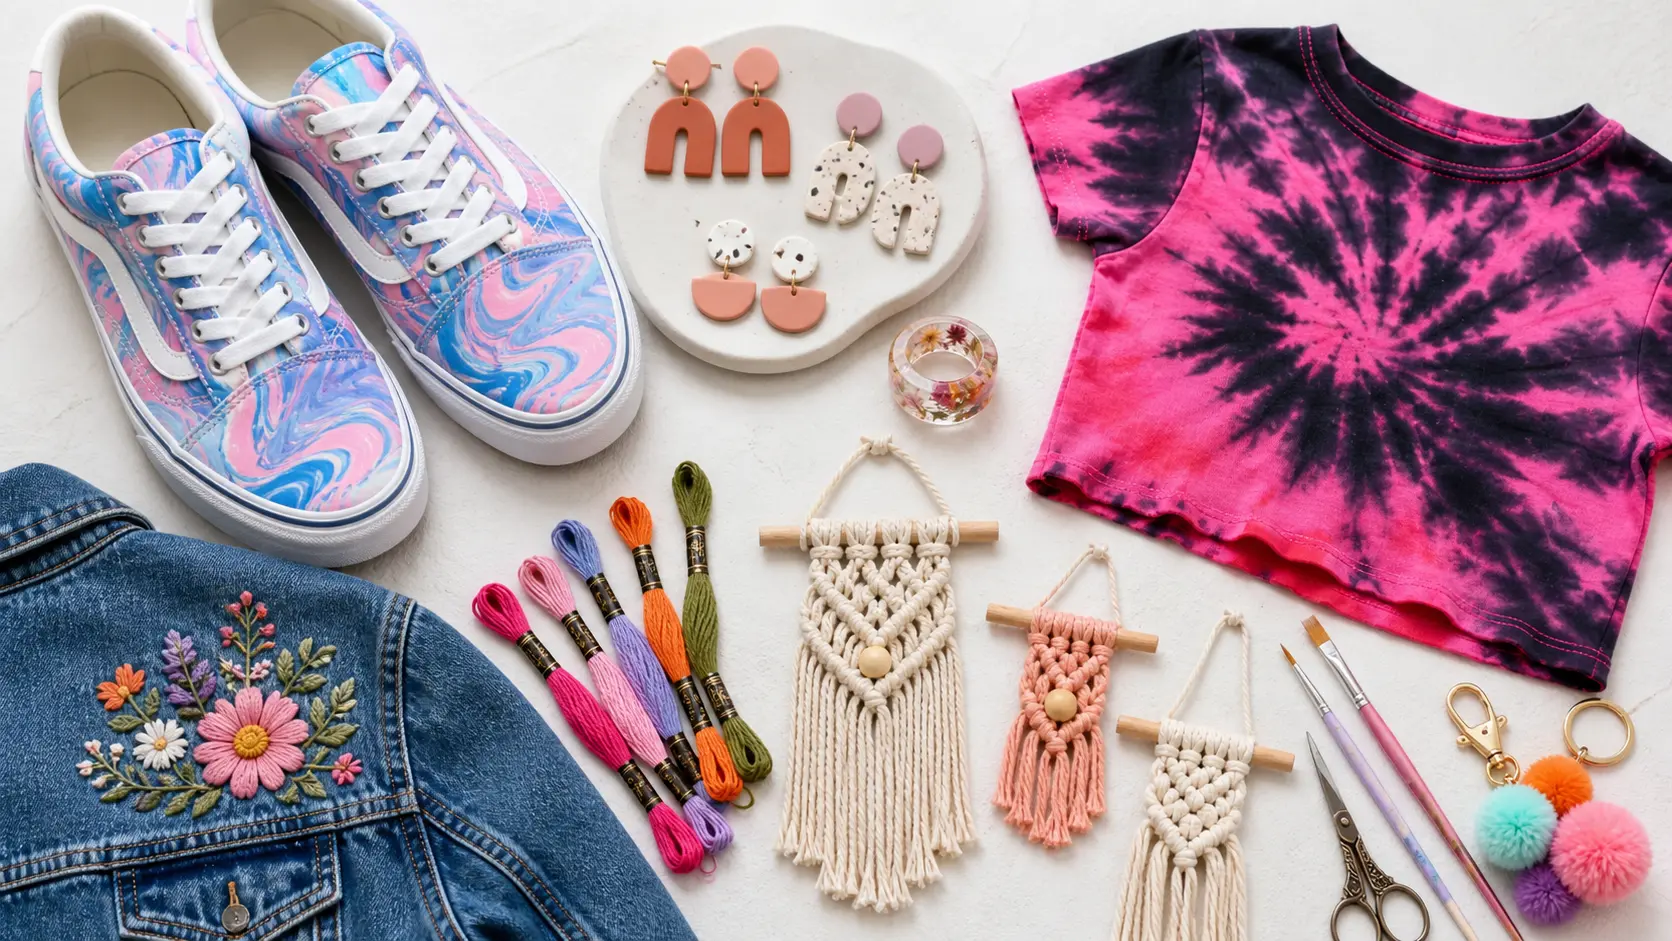
Finding crafts for teens that they’ll actually want to make can feel like searching for a needle in a haystack! When my kids hit their teen years, I noticed they wanted projects that felt grown-up and on-trend, not the simple kid crafts from their younger days. Teens are drawn to fun crafts for teens that let them express themselves and create things they’re genuinely proud of. Moreover, they love DIY crafts for teens that result in room decor, accessories, or gifts for friends. I’ve gathered 27 craft ideas for teens covering everything from polymer clay jewelry to custom sneaker designs!
Hydro Dipping Vans and Sneakers

Image Source: YouTube
Hydro dipping transforms plain Vans or sneakers into statement pieces that teens love wearing. This water-marbling technique creates swirled patterns that look professional without requiring artistic skills.
What You’ll Need
Start with canvas shoes like Vans, Converse, or Nike Air Force 1. You’ll need 2-3 cans of spray paint with a gloss finish (Rust-Oleum 2X works well for coverage), painter’s tape, a plastic storage tub, lukewarm water, gloves, and a dust mask. Grab isopropyl alcohol to strip the factory finish from smooth surfaces, plastic bags to stuff inside shoes, and a metal or silicone stir stick[2]. Don’t use wooden sticks since paint clings to them. Finish with a clear coat or waterproofing spray to protect your design.
How to Create Custom Designs
Tape off the soles and any areas you want to keep white. Rub isopropyl alcohol over smooth surfaces to help paint adhere. Fill your tub halfway with lukewarm water (avoid working when it’s under 50 degrees outside, lest the paint congeals too quickly). Spray paint colors onto the water surface in separate areas, swirl with your stick, then dip the shoe upside down slowly[2]. Pull it out quickly so the swirled paint transfers.
Best Color Combinations
Three colors create more dynamic results than two. Pick vivid, contrasting shades rather than similar tones for the most striking patterns.
Tie Dye Fashion Projects

Image Source: Happy Mothering
Tie-dye has made a major comeback as one of the most popular arts and crafts for teens. When my oldest daughter wanted to create her own cropped tees with unique patterns, we discovered how easy and affordable this craft is for self-expression.
What You’ll Need
A One-Step Tie-Dye Kit contains everything to start: pre-measured dyes in squeeze bottles, rubber bands, and gloves. Grab natural fiber items like 100% cotton t-shirts, as synthetics yield paler results. You’ll need plastic bags for setting dyed items, a vinyl tablecloth to protect surfaces, and paper towels. Given that dye powder creates fine particles, wear a dust mask during mixing.
How to Create Custom Designs
The swirl pattern remains iconic and simple. Pinch the shirt center, twist clockwise into a flat spiral, secure with rubber bands, then apply different colors to each section. For stripes, fold the fabric accordion-style and dye alternating sections. My son experimented by bunching small amounts with rubber bands and dyeing the bunched parts orange while striping the rest, creating a cosmos effect. Let projects sit 6-8 hours for dye to set properly.
Best Color Combinations
Pastel shades like baby pink and sky blue create dreamy looks. Bold contrasts using neon pink against black grab attention. Avoid brown, green, and orange together unless seeking dull effects.
Polymer Clay Jewelry

Image Source: YouTube
Polymer clay jewelry ranks among the most versatile DIY crafts for teens since it requires minimal equipment yet produces professional-looking pieces. I started making earrings with my daughter, and we found Sculpey Premo and Sculpey Soufflé deliver the best results for jewelry. Soufflé is lightweight and holds detail exceptionally well, while Premo offers strength and flexibility.
What You’ll Need
Sculpey Premo or Soufflé clay forms the foundation. You’ll need an acrylic roller (never wooden, as grooves leave imprints), clay cutters in various shapes, tissue blades for removing clay from surfaces, and a ceramic tile as your work surface. Add earring posts, jump rings, jewelry pliers, and super glue for assembly. An oven thermometer ensures accurate baking at 275°F for 30 minutes per quarter-inch thickness. Isopropyl alcohol on cotton tips removes fingerprints before baking.
How to Create Custom Designs
Condition clay by kneading until warm and pliable. Roll to desired thickness using playing cards as guides, cut shapes with cutters, then poke holes for jump rings. Bake on parchment paper, cool completely, then assemble with findings.
Best Color Combinations
For 2026, earthy tones like terracotta and olive green dominate fall collections, while pastel blues and blush pinks suit spring designs. Retro mustard yellow paired with deep teal creates bold statement pieces.
Resin Ring Making

Image Source: Gathered
Resin rings offer one of those easy crafts for teens that produce jewelry pieces worthy of selling. I found my daughter mixing colors and pouring layers for hours, creating crystal-clear rings with suspended flowers and glitter effects.
What You’ll Need
Mod Podge Resin forms your base material, requiring a 1:1 ratio of resin to hardener. Silicone ring molds come in various sizes, while mica powder adds shimmer and color. Stock up on disposable cups, large popsicle sticks for stirring, and gloves. Epoxy resin provides stronger adhesion and tougher water resistance once cured. For colorants, keep your ratio at about 10% colorant to resin. Acrylic paint works but exceeding 10% will chemically alter the resin composition. Other colorant options include glitter, dried flowers, alcohol ink, and glow-in-the-dark pigments.
How to Create Custom Designs
Mix resin consistently for three minutes, minimizing bubbles with gentle stirring. Divide mixed resin into cups, blend in mica powders until combined, then pour thin streams into molds. Layer the resin, filling partway and letting it settle before adding embellishments like foils or glitter between layers. Fill to the designated line and cure for 24 hours.
Best Color Combinations
Sky blue with lilac creates ethereal effects, while magenta paired with turquoise produces bold statements.
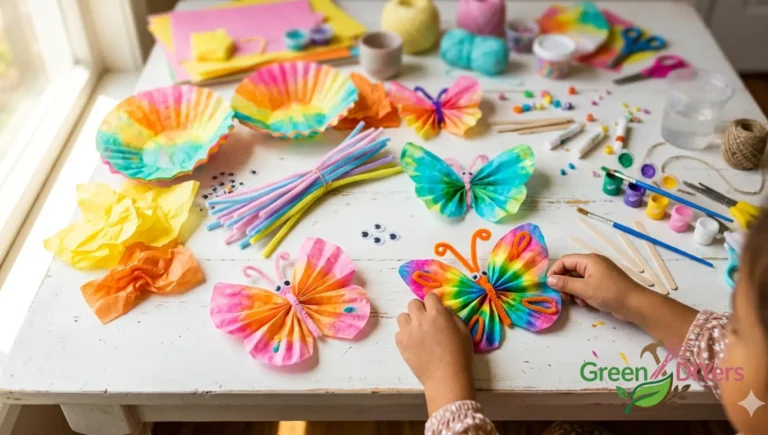
Air Dry Clay Creations

Image Source: YouTube
Air dry clay stands out among craft ideas for teens because it requires zero special equipment. My kids can sculpt ring holders, planters, and jewelry dishes without touching an oven.
What You’ll Need
You can make homemade clay with 2 cups baking soda, 1 cup cornstarch, and 1 1/2 cups cold water. For store-bought options, Crayola Air Dry Clay works well for beginners, though Activa La Doll Premier holds finer details. Gather a rolling pin, cookie cutters, and sculpting tools. A spray bottle keeps clay workable since it dries quickly. Wire clay cutters divide blocks cleanly, while loop tools hollow out sections. Wooden modeling tools smooth surfaces and add decorative touches.
How to Create Custom Designs
Condition your clay by kneading until smooth and pliable. Roll to about a quarter-inch thickness to prevent cracking. For joining pieces, score both surfaces with a toothpick, add slip (clay mixed with water), then press together. Smooth imperfections with a damp sponge. Projects take 24 to 72 hours to dry completely.
Best Color Combinations
Tempera paint works best for coloring clay before shaping. Acrylic paint also performs well but stains clothes permanently. Colors appear lighter after drying, creating pastel effects.
DIY Natural Cosmetics

Image Source: Wellness Mama
Making natural cosmetics offers arts and crafts for teens who want control over what goes on their skin. I discovered formulating foundation and bronzer at home costs a fraction of store prices while avoiding harsh chemicals.
What You’ll Need
Arrowroot powder forms your base ingredient, matched with cocoa powder and cinnamon for pigment. Zinc oxide adds coverage, while mica powder creates radiance. For deeper shades, add finely ground beet root or hibiscus flowers. Activated charcoal works for eyeliner and mascara formulations. You’ll need protective gloves, a digital bench scale for precision, glass mixing bowls, and a spray bottle filled with isopropyl alcohol for sterilization. Store finished products in sterilized containers with proper labels.
How to Create Custom Designs
Start with 2 tablespoons arrowroot powder as your foundation base. Add pigments gradually, testing shades on your hand between additions. Record exact amounts so you can replicate successful formulas. For adjusting undertones, blue ultramarine counters orange tones while yellow iron oxide warms cold undertones. Mix activated charcoal with equal parts coconut oil and shea butter for smooth eyeliner.
Best Color Combinations
Natural pigments like anthocyanins shift colors based on pH levels, displaying blue to purple to red across the spectrum.
Scented Bath Bombs

Image Source: Inspired By Charm
Bath bombs create that satisfying fizz while releasing aromatherapy scents, making them fun crafts for teens who enjoy spa experiences. The fizzing reaction happens when citric acid meets baking soda in water, creating an effervescent display.
What You’ll Need
The standard ratio uses 2 parts baking soda to 1 part citric acid by weight. A basic recipe includes 1 cup baking soda, 1/2 cup citric acid, 1/2 cup cornstarch, and 1/2 cup Epsom salt. Add 2 1/2 tablespoons melted coconut oil (though almond or olive oil works too). Include 8-10 drops of essential oils for scent. Witch hazel in a spray bottle adds moisture without triggering premature fizzing. Grab silicone molds and liquid food coloring if desired.
How to Create Custom Designs
Whisk dry ingredients to remove clumps. Mix wet ingredients separately, then slowly combine them while whisking. Spray witch hazel lightly until the mixture reaches damp sand consistency. Pack tightly into molds and let cure 24 hours before unmolding.
Best Color Combinations
Liquid colorants disperse better than gels. Mica powders add shimmer but require polysorbate 80 to prevent tub rings. Natural options include kaolin clay for soft colors or activated charcoal for dramatic black effects.
Custom Candle Painting

Image Source: YouTube
Candle painting lets teens personalize plain candles with designs they can actually burn safely when done right. The key distinction: painting with melted colored wax remains safe for burning, while acrylic paint raises safety concerns since we don’t know what happens when it heats or catches fire.
What You’ll Need
Gather plain white or colored pillar candles, colored tealight candles for your paint source, and a fine-tipped paintbrush. Silicone brushes work better than bristle types since wax doesn’t stick in non-existent bristles. Keep paper towels handy for wiping your brush, plus toothpicks for scraping mistakes. A candle warmer or small heatproof dish holds melted wax while you work. For acrylic painting, grab non-toxic acrylic paint and very fine pointed brushes for control on rounded surfaces.
How to Create Custom Designs
Light colored tealights and wait for wax pools to form. Dip your brush in melted wax and paint your design quickly before it cools. Apply 1-2 additional layers of the same color for deeper hues. Wipe your brush after every few dips to prevent wax buildup. Mistakes can be scraped with a toothpick or wiped off with paper towel before cooling.
Best Color Combinations
Paint with wax colors that contrast your candle base for designs that stand out. Warm colors like reds and oranges evoke coziness, while blues and greens create calming effects.
Embroidery on Denim

Image Source: YouTube
Embroidering denim jackets and jeans personalizes wardrobe staples with designs that reflect individual style. I watched my daughter transform a thrift-store jacket into something she wears constantly, proving this ranks among the most rewarding fun crafts for teens.
What You’ll Need
Denim fabric (jackets, jeans, or shirts), embroidery floss in vibrant colors, and sharp thick needles form your foundation. Chenille needles in sizes 18-22 work best for hand embroidery, while size 3 embroidery needles pierce thick fabric without breaking. Water-soluble stabilizer lets you print designs, stick them onto denim, and embroider through both layers before dissolving the stabilizer in water. A 6-8 inch embroidery hoop keeps fabric taut. For protection, iron-on backing prevents stitches from snagging during wear.
How to Create Custom Designs
Wash and dry your denim first to prevent shrinkage after embroidering. Transfer designs using water-soluble markers, carbon paper, or by stitching through printed patterns pinned to fabric. Bold florals and geometric shapes work better than intricate details on thick fabric. Popular placements include pockets, hems, side seams, and symmetrical designs on jean fronts.
Best Color Combinations
Vibrant colors stand out against blue denim. For dark denim, bright whites, golds, turquoise, or bold reds create high contrast.
Macrame Wall Art

Image Source: Pinterest
Knotting macrame wall hangings gives teens a meditative craft that produces boho-chic room decor. I found this art form particularly satisfying since mistakes can be undone by simply unknotting and starting over.
What You’ll Need
Stock 4mm and 3mm macrame yarn in various colors as your foundation. Sharp crafting scissors or hair-cutting scissors trim fringe evenly. A wooden dowel rod, driftwood piece, or stick serves as your hanging base, while metal rings work for round designs. Grab a fabric stiffener, animal fur brush, comb, and embroidery yarn for finishing touches. Three strand rope holds knot shapes better but feels stiffer, while single strand string creates beautiful fringe and goes easier on your hands. The general rule: cut cord at four times your desired finished length, or eight times when folding in half.
How to Create Custom Designs
Start with simple knots before attempting complex patterns. Square knots form the backbone of most designs. Mix and match colors for eye-catching results, or combine floral and leaf elements for seasonal variety. Large projects require thicker cords, while delicate pieces benefit from thinner options.
Best Color Combinations
Natural shades pair beautifully with vibrant accent colors. Seasonal palettes work well—spring pastels, summer brights, fall earth tones.
Screen Printed T-Shirts

Image Source: YouTube
Screen printing your own t-shirts delivers professional results that rival store-bought apparel. This technique uses mesh screens to transfer designs onto fabric, creating durable prints that withstand repeated washing.
What You’ll Need
A screen printing frame consists of wood or aluminum stretched with polyester mesh. Mesh count matters: lower counts suit solid color designs, while higher counts capture intricate detail. You’ll need photosensitive emulsion and an exposure unit that uses UV light to harden the screen. Grab a squeegee for spreading ink evenly, with medium durometer providing versatility. Plastisol ink is beginner-friendly, durable, and easy to work with. Water-based ink offers a softer finish but dries in the screen. For artwork, programs like Adobe Illustrator, Photoshop, or Procreate separate colors since you print one color at a time. Each color requires its own screen. A flash dryer cures ink between layers when printing multiple colors.
How to Create Custom Designs
Print your design on film positives using black ink. Coat screens with emulsion in a darkroom, expose with your film positive, then rinse with water. The unexposed areas wash out, leaving open mesh reflecting your design. Apply pallet adhesive to prevent shirts from shifting, flood the screen with ink, then push it through with your squeegee.
Best Color Combinations
Designs should be at least 300 DPI for sharp prints. Spot colors deliver bold, vibrant results.
Pottery Painting Ideas

Image Source: Brighter Craft
Painting ceramics at local studios or home gives teens creative freedom to turn mugs, plates, and vases into personalized artwork. Underglazes, colored slips, glazes, and oxide stains all work as “paint” on porous bisqueware surfaces.
What You’ll Need
For studio painting, you’ll work with bisque-fired pottery, underglazes in various colors, brushes ranging from fine-tipped to broad, and a clear glaze finish. AMACO semi-moist underglaze pans create watercolor-like effects that are easier to control than liquid versions. At home, grab ceramic or bisque pieces, acrylic paints designed for ceramics, fine and medium brushes, painter’s tape for clean lines, and a clear sealant. Underglaze pencils, fineline applicators, glaze brushes, and pottery sponges bring designs to life.
How to Create Custom Designs
Sketch your design with pencil first since it burns off in the kiln. Liquid underglazes require three layers to reach full strength and create painterly effects. Techniques like sgraffito involve scratching through underglaze to reveal clay beneath, while wax resist creates patterns by repelling paint. Dark colors bleed through overlying layers even when invisible before firing.
Best Color Combinations
Following application, cure acrylic-painted ceramics at 140°C for approximately 30 minutes. Layer translucent paints with sponges for dimensional, weathered textures.
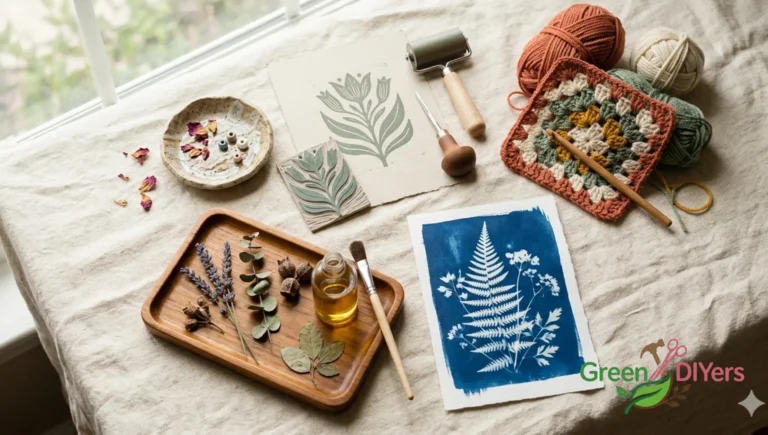
Cyanotype Photography Prints

Image Source: YouTube
Cyanotype printing harnesses sunlight to create photographic images without cameras, producing distinctive Prussian blue prints discovered in 1842. This alternative photographic process uses hand-applied chemistry and UV light rather than digital tools.
What You’ll Need
Beginners can start with pre-coated cyanotype paper or ready-mixed solutions before progressing to mixing their own materials. For DIY chemistry, you’ll need 25 grams Ferric ammonium citrate (green) and 10 grams Potassium ferricyanide, each mixed with water to make 100 mL solutions. Mix equal parts of both solutions before coating. Paper selection matters since texture and absorbency affect results. Arches Aquarelle, Canson XL Watercolor, and Hahnemühle Platinum Rag work well. Natural fabrics like cotton, linen, and silk absorb chemistry best. You’ll also need a wide hake or foam brush for coating, glass to weigh down objects, and water for rinsing.
How to Create Custom Designs
Coat paper with mixed solution using slow, even strokes, then dry completely in darkness. Arrange objects like flowers, lace, or glass directly onto coated paper, secure with glass, and expose in direct sunlight for 10 minutes to an hour until it shifts to greenish tone. Rinse in cold water for 5-10 minutes until water runs clear. The blue deepens over the next day or three as oxidation continues.
Best Color Combinations
Toning with tea, coffee, or wine creates sepia-toned effects. Green tea produces aubergine brown without excessive paper staining.
Handmade Soap Bars

Image Source: Lovely Greens
Crafting handmade soap bars gives teens complete control over ingredients, scents, and designs. Melt-and-pour methods skip the chemistry while cold process soap making offers deeper customization through saponification.
What You’ll Need
For melt-and-pour projects, grab a goat’s milk soap base, essential oils, cosmetic-grade liquid colors, silicone soap molds, and a glass measuring cup. Cold process requires a kitchen scale for weighing ingredients, digital thermometer, immersion blender, stainless steel pot, heat-proof jugs, soap molds, silicone spatula, goggles, and rubber gloves. Sodium hydroxide (lye) creates soap through saponification when mixed with oils. Stock olive oil, coconut oil, shea butter, and distilled water as base ingredients.
How to Create Custom Designs
Textured tops add artisanal appeal using simple tools. Spoons create peaks and valleys by pushing up soap batter. Spatulas make wider swoops and mountain-like patterns. Bubble wrap pressed onto thick batter creates honeycomb indents. For swirls, alternate colored pours into loaf molds, creating different patterns with each cut bar. Stop swirling at the first “wow” moment before colors muddy together. Botanicals like lavender buds, rose petals, or pink Himalayan salt finish tops beautifully.
Best Color Combinations
Complementary colors like yellow and purple or orange and blue harmonize perfectly. Monochromatic gradients using different shades create elegant effects.
Watercolor Painting Techniques

Image Source: YouTube
Watercolor remains one of the most accessible arts and crafts for teens since it builds foundational painting skills while producing stunning results. I found my kids gravitating toward watercolor after trying other mediums because mistakes can be lifted and colors blend beautifully.
What You’ll Need
Start with 90lb or 140lb watercolor paper, as regular paper soaks through and reduces technique effectiveness. Student-grade watercolor sets work perfectly, with pan or liquid forms both delivering vibrant results. You’ll need round brushes in sizes 4, 8, and 12 for detail work through large washes. Additionally, stock waterproof black markers like Sharpies, non-water soluble oil pastels or waxy crayons, table salt, and a mixing palette. Two water jars help keep colors clean.
How to Create Custom Designs
Four techniques form the foundation. Waterproof marker creates precise lines that stay crisp under paint. Wax resist adds colorful details that watercolor won’t cover. For wet-on-wet blending, brush water onto paper first, then dab colors that spread like stars. Salting creates magical starburst textures when sprinkled on wet paint, though translucent watercolors work best.
Best Color Combinations
Mixing warm and cool primary colors extends your palette significantly. Phthalo Green paired with Pyrrol Crimson produces rich blacks, while Ultramarine with Burnt Sienna creates excellent neutrals.
Beaded Jewelry Designs

Image Source: YouTube
Beading allows teens to create wearable art without expensive equipment or lengthy tutorials. All-in-one beaded jewelry kits include everything needed: vibrant beads in glass, acrylic, and wooden varieties, stretch cords suited for bracelets, clasps, connectors, and step-by-step instructions. These kits cater to different skill levels, from simple single-strand bracelets to intricate multi-strand designs.
What You’ll Need
Round-nose pliers create loops in wire or headpins, while flat-nose pliers flatten crimp beads to secure them once strung onto wire. Wire cutters handle cutting strips of wire, chain, and shortening headpins. Beading needles help string seed beads with ease. For materials, beading cord and wire form the foundation, available in different color styles and wire diameters. Stretch Magic elasticated string works perfectly for stretch bracelets. Stock findings like spacer beads, bails, bead caps, and earwires to piece projects together.
How to Create Custom Designs
Popular projects include charm bracelets with personalized stories, friendship bracelets using colorful patterns, layered bracelets in coordinating colors, alphabet beaded bracelets spelling names, and boho-style anklets.
Best Color Combinations
Start with a focal color capturing your design’s essence, add complementary colors for contrast, incorporate neutrals like white or beige for balance, then experiment with metallic beads in gold, silver, or bronze for elegance.
Decorative Wax Melts

Image Source: YouTube
Wax melts bring fragrance into homes without open flames, making them one of the safer craft ideas for teens interested in scent-based projects. Silicone candy molds handle heat well, come in various shapes, and release finished melts easily. Clamshell molds eliminate extra packaging needs while creating professional-looking products.
What You’ll Need
Paraffin, soy, parasoy, or coconut wax forms your base. Golden Wax 494, C55 Caluxe, and Maker’s Blend 150 are specifically formulated for melts. Wax dye chips add color, though paraffin (being translucent) requires less dye than opaque waxes like soy or beeswax. Candle fragrance oils scent your melts, with quality varying significantly between brands. Additionally, you’ll need a double boiler, thermometer, and stirring utensil.
How to Create Custom Designs
For soy wax, pour at 55-65°C for optimal scent throw. Layering creates dimensional effects by pouring thin colored layers and letting each set slightly before adding the next. Sprinkle glitter, dried flowers, or mica powder before pouring for decorative touches. Marble effects require swirling dye into wax without stirring to maintain the pattern.
Best Color Combinations
Color concentration affects vibrancy: 1 drop per 4 oz creates light shades, while 10 drops produces deep tones. Natural soy wax yields pastel colors, whereas paraffin-based waxes achieve more vibrant results.
Painted Succulent Planters

Image Source: Tilly’s Nest
Painting terra cotta pots turns simple succulent containers into conversation pieces that complement any room design. Hand-decorated planters mesh indoor gardens with existing decor while keeping plants healthy through proper drainage.
What You’ll Need
Terra cotta pots form your base, while milk paint keeps plants safe and provides beautiful color. Acrylic craft paints work well for vibrant hues, though thinning with water helps coat pots evenly. Sample paint from home improvement stores offers budget-friendly options. Foam brushes apply smooth strokes and wipe excess paint during dipping. Clay pot sealer slows moisture absorption and prevents white mineral stains. You’ll also need stiff brushes for removing price tags by soaking pots in warm water up to an hour.
How to Create Custom Designs
Clean pots thoroughly and sand lightly for better paint adhesion. Applying sealer first reduces moisture loss. For dipped effects, submerge pots at desired heights or angles, then slowly wipe off excess with foam brushes to prevent running and bubbling. Color washes using half paint and half water create subtle effects where terra cotta shows through. Distressing, layering colors, or adding patterns gives creations character.
Best Color Combinations
Pastels soften spiky aloe or echeveria, while earth tones complement jade or haworthia. Contrasting hues make bright green succulents pop.
Upcycled Denim Projects

Image Source: YouTube
Transforming worn jeans into functional items prevents fabric waste while creating one-of-a-kind pieces. Denim’s durability makes it perfect for upcycling projects that withstand wear and last years. The variety of weights, finishes, and colors available at thrift stores allows endless creative possibilities.
What You’ll Need
Old jeans in various shades form your foundation, whether stained or ripped. A jeans needle (sizes 90-110) penetrates thick fabric without breaking, as its reinforced shaft handles dense seams. Sharp fabric scissors cut cleanly through multiple layers. Lightweight interfacing stabilizes stretch denim when mixing with non-stretch varieties. Additionally, keep zippers, buttons, rivets, and other hardware for embellishments or functional details.
How to Create Custom Designs
Popular projects include tote bags using original pockets and seams, storage pouches from pant legs with simple hand stitching, pocket organizers by rearranging pre-made pockets on backing fabric, and cushion covers featuring back pockets and zippers. Rag rugs require cutting denim into strips and threading through burlap or sackcloth. Planters gain character when wrapped in denim fabric. The thick felled seams running down jean legs are durable design elements worth preserving in projects.
Best Color Combinations
Mixing light wash, medium indigo, and dark denim creates dimensional patchwork effects. Contrasting blue denim with bright accent fabrics produces eye-catching results.
Friendship Bracelet Patterns

Image Source: Cutesy Crafts
Friendship bracelets bring teens together through shared crafting sessions while teaching knotting skills rooted in macrame tradition. I’ve watched groups of teens knot for hours, trading patterns and color ideas as they create gifts for each other.
What You’ll Need
Embroidery floss forms your foundation material, with brand mattering less than color selection. Amazon offers rainbow packs with diverse shades at reasonable prices. Cut strands to 32″ for standard bracelets. Masking tape, clipboards, or safety pins hold threads taut while knotting. Sharp scissors trim excess thread cleanly.
How to Create Custom Designs
Master four basic knots first: forward, backward, forward-backward, and backward-forward combinations. Chinese Ladder builds muscle memory using single-knot repetition, Candy Stripe teaches forward knots through diagonal striping, while Chevron introduces backward knots with mirrored patterns. Hearts and diamonds expand skills by strategically placing knots to form shapes. Patterns use letters across the top showing thread colors, numbered rows tracking progress, and arrows indicating which knots to tie.
Best Color Combinations
Contrast between dark and light shades matters more than specific hues since similar brightness levels blur together. Analogous colors sitting adjacent on the color wheel create harmony, complementary opposites produce bold contrast, while monochromatic schemes use varying shades within one color family. For instance, mustard yellow paired with dark teal and maroon delivers striking results.
Punch Needle Plant Hangers

Image Source: Gathered
Combining fiber art with functional home decor, punch needle plant hangers merge texture-rich wall hangings with practical greenery displays. This embroidery technique creates loops of yarn through woven cloth using a hollow tool.
What You’ll Need
An Oxford size 10 regular punch needle forms your foundation tool. Stock rug yarn in multiple colors, with 180g each providing sufficient material. Monk’s cloth works perfectly for beginners due to its forgiving weave that allows easy stitch removal if mistakes occur. A stretcher bar frame (50x23cm) keeps fabric taut during punching. You’ll also need backing cloth for structure, a wide-eyed tapestry needle for finishing, and a plant pot around 10.5cm diameter. Additionally, gather a marker pen for transferring designs and basic embroidery supplies.
How to Create Custom Designs
Thread your needle by sliding yarn through the tip hole, pulling it through the slot while leaving a 1/2″ tail. Punch designs onto both front and back of the frame to achieve flat and loop stitch combinations. Keep slack in your yarn as tension causes loops to slip out. Plan color placement on paper first, avoiding identical colors side by side.
Best Color Combinations
Light blue, mustard, pink, red, and white create vibrant contrasts. Switching between five colors produces dynamic plant hangers that complement various interior styles.
Custom Mug Art

Image Source: Artistro
Personalizing ceramic mugs transforms everyday drinkware into gifts friends actually keep and use. Oil-based paint pens survive washing better than acrylic versions, making them worth the investment for long-lasting designs.
What You’ll Need
Cotton disks and degreaser (ethyl alcohol, nail polish remover, or white spirit) remove oils that prevent paint adhesion. Acrylic paint works for base coats, while ceramic markers or contour paints create detailed drawings. Painter’s tape masks off areas you want unpainted. For sealing, dishwasher safe Mod Podge requires 30 days to cure fully. Cotton swabs correct mistakes before paint dries.
How to Create Custom Designs
Degrease the mug surface thoroughly first. Tape off the bottom if painting it separately, apply thick acrylic paint layers, then bake at 325-350 degrees F for 30-35 minutes. Markers dry naturally in 24 hours without baking, though heat-setting increases durability. Keep designs 0.75 inch from the rim since paint near lip areas raises safety concerns. Dot painting works beautifully on mugs when dots maintain consistent size and minimal spacing within each line.
Best Color Combinations
Choose colors contrasting with your mug base so patterns stand out clearly. Black on white delivers classic appeal, while gold on navy creates elegant designs.
Tassel Accessories

Image Source: YouTube
Tassels add movement and softness to accessories while requiring minimal supplies. Teens appreciate how quickly these come together for keychains, earrings, and bag charms.
What You’ll Need
Your choice of yarn, embroidery floss, ribbon, fabric strips, or tissue paper forms the foundation. Scissors cut cleanly through materials, while a darning needle helps with finishing touches. A piece of cardboard becomes your winding board, with its length determining your finished tassel size. For keychains, gather embroidery thread (2-3 packs per tassel), white hemp cord, metallic stringing, large clasps with split key rings, and various beads. Small tassels measuring 2-5cm work perfectly for earrings and bracelets, medium 5-8cm sizes suit bag charms, while large 8-12cm versions make bold interior design statements.
How to Create Custom Designs
Wind thread around cardboard until satisfied with thickness. Slide wound thread off, tie tightly around the middle with a separate piece, then cut through looped ends. Wrap the neck by creating a loop, winding thread tightly downward, then tucking ends inside. For keychains, loop hemp cord through the clasp, thread beads, layer embroidery threads, and wrap with metallic string.
Best Color Combinations
Silk tassels offer glossy sheens for elegant projects, cotton provides matte textures for boho styles. Pastels like blush pink and powder blue create soft looks, while jewel tones deliver modern boldness.
Pom Pom Keychains

Image Source: YouTube
Fluffy pom poms attached to keychains deliver instant charm while requiring surprisingly few materials. Using a pom pom maker simplifies this craft significantly, producing consistent results that teens love clipping onto backpacks and keys.
What You’ll Need
Rainbow yarn sets provide color variety, while a pom pom maker set streamlines the process. Craft hardware sets include keychain clasps and jump rings for attachment. Sharp scissors trim loops cleanly. Variegated yarn creates multi-toned effects without switching colors. For elaborate versions, add tassels, wooden beads, and a yarn needle for stringing components together.
How to Create Custom Designs
Wrap yarn around your pom pom maker until fully covered. More wraps create fuller pom poms. Cut a 5-inch piece of yarn, slide it under the wound yarn, and tie tightly around the middle. Remove from the maker, cut all loops, then trim into a circle shape. Fluff and trim dangling ends. Cut a 7-inch yarn piece, wrap it around your pom pom’s middle, loop through the keychain, and knot securely. Personalize by gluing felt decorations or winding different colored yarns together.
Best Color Combinations
Mixing charcoal with wine and peach produces unique combos, while turquoise paired with gray creates stylish contrast.
Woven Tapestry Projects

Image Source: Gist Yarn
Weaving tapestries on simple looms creates textured wall art that showcases individual artistic vision. This fiber technique uses vertical warp threads held under tension while horizontal weft threads weave through to build images and patterns.
What You’ll Need
A frame loom measuring 30x45cm holds your work, though you can make one from wood or cardboard. Cotton tapestry warp or seine twine (12/9 or 12/6 sizing) provides the vertical foundation. Wool fibers in 12ply weight create your weft, with options like Harrisville Highland for single-strand weaving at 8 ends per inch or thinner yarns like Array requiring 3-4 bundled strands. Additionally, gather scissors, a tapestry fork for beating weft into place, a shed stick for lifting alternate warps, and blunt tapestry needles. Budget-conscious weavers can use picture frames from thrift stores or construct copper pipe looms for around $30.
How to Create Custom Designs
The warp runs vertically under tension while weft passes horizontally over and under. Mixing different textured yarns and playing with colors and materials creates dimensional effects. Techniques like rya knots add fringes, while soumak produces braided textures.
Best Color Combinations
Selecting one yarn type simplifies tension management for beginners. Firm, non-lofty yarns pack better than bouncy knitting wools.
Floral Paper Garlands

Image Source: YouTube
Paper flower garlands brighten rooms with lasting blooms that never wilt or need watering. Text weight paper in shades like gold, mandarin, azalea, botanic, and fairway creates dimensional florals perfect for mantels, windows, or doorways.
What You’ll Need
Text weight paper forms your foundation, whether ordering pre-selected color palettes or browsing individual sheets. Sharp scissors or a cutting machine speed up the process. You’ll need glue for assembly, green ribbon or thin twine for stringing, and a craft needle with a wide eye for threading. Curling tools or the edge of scissors shape realistic petals. Cutting 15 of each flower design provides sufficient blooms for a standard garland.
How to Create Custom Designs
Curl paper petals using your scissors’ edge or a dedicated curling tool before assembly. Loop finished flowers around the ribbon strand, securing each with glue. Dot leaves between blooms for natural spacing. Thread thin ribbon onto a craft needle to sew flowers and leaves together, creating cohesive garlands.
Best Color Combinations
White shades suit wedding backdrops with classic elegance, while bold patterned papers energize children’s parties. Coral tones pair beautifully with gold and azalea for spring decor.
Easy Crochet for Teens

Image Source: YouTube
Crochet appeals to teens seeking portable, affordable crafts that create wearable accessories. Scarves, beanies, bags, and blankets feel modern when worked in trending colors.
What You’ll Need
Hook sizes between I (5.5mm) and L (8.00mm) work best for beginners. Aluminum hooks glide smoothly through yarn while remaining lightweight. Bamboo and wood options feel warm in your hands. Besides your hook, stock medium weight worsted yarn that shows stitches clearly. Avoid highly textured and dark colored yarns since they hide stitch definition. Sharp scissors, a tapestry needle for weaving ends, and stitch markers complete your kit.
How to Create Custom Designs
Beginner-friendly projects include skull cap beanies, scarves using simple fan stitches, and granny square bags. Starting with chunky yarn and larger hooks builds confidence quickly. Most patterns available at stores like Target, Walmart, and Michaels use accessible materials.
Best Color Combinations
Complementary colors like yellow and violet or orange and blue create strong contrasts. For softer palettes, try beach-inspired combinations like blush pink, salmon, and turquoise. Floral schemes mixing bubblegum, peach, buttercup, and jade green produce vibrant results. Analogous colors sitting adjacent on the color wheel harmonize beautifully.
Comparison Table
Comparison Table: 27 Cool Crafts for Teens
| Craft Name | Primary Materials | Special Tools/Equipment | Completion/Curing Time | Skill Level | Popular Uses/Applications |
|---|---|---|---|---|---|
| Hydro Dipping Vans and Sneakers | Canvas shoes, 2-3 cans spray paint (Rust-Oleum 2X), painter’s tape, plastic tub, lukewarm water | Dust mask, gloves, metal/silicone stir stick, isopropyl alcohol | Quick drying; avoid under 50°F | No artistic skills required | Statement footwear, custom sneaker designs |
| Tie Dye Fashion Projects | 100% cotton t-shirts, One-Step Tie-Dye Kit, rubber bands | Dust mask, vinyl tablecloth, plastic bags | 6-8 hours for dye to set | Easy and affordable | Cropped tees, fashion items, self-expression |
| Polymer Clay Jewelry | Sculpey Premo or Soufflé clay, earring posts, jump rings | Acrylic roller, clay cutters, tissue blades, ceramic tile, oven thermometer | 30 minutes baking at 275°F per 1/4 inch | Minimal equipment, professional results | Earrings, jewelry pieces |
| Resin Ring Making | Mod Podge Resin (1:1 ratio), mica powder, glitter, dried flowers | Silicone ring molds, disposable cups, popsicle sticks, gloves | 24 hours curing | Intermediate | Jewelry worthy of selling |
| Air Dry Clay Creations | Baking soda, cornstarch, water (homemade) or Crayola/Activa La Doll | Rolling pin, cookie cutters, sculpting tools, spray bottle | 24-72 hours to dry | Beginner-friendly, no oven needed | Ring holders, planters, jewelry dishes |
| DIY Natural Cosmetics | Arrowroot powder, cocoa powder, cinnamon, zinc oxide, mica powder | Digital bench scale, glass mixing bowls, spray bottle with isopropyl alcohol | Not mentioned | Requires precision | Foundation, bronzer, eyeliner |
| Scented Bath Bombs | Baking soda, citric acid (2:1 ratio), cornstarch, Epsom salt, coconut oil | Silicone molds, whisk, spray bottle with witch hazel | 24 hours curing | Standard recipe-following | Spa experiences, aromatherapy |
| Custom Candle Painting | Plain pillar candles, colored tealight candles, non-toxic acrylic paint | Fine-tipped paintbrush (silicone preferred), candle warmer, toothpicks | Quick; wax cools rapidly | Easy technique | Personalized candles, room decor |
| Embroidery on Denim | Denim fabric, embroidery floss, water-soluble stabilizer | Chenille needles (sizes 18-22), 6-8 inch embroidery hoop, iron-on backing | Not mentioned | Requires patience | Personalized jackets, jeans customization |
| Macrame Wall Art | 4mm and 3mm macrame yarn, wooden dowel/driftwood | Sharp scissors, metal rings, fabric stiffener, animal fur brush | Not mentioned | Meditative, mistakes easily undone | Boho-chic room decor, wall hangings |
| Screen Printed T-Shirts | Photosensitive emulsion, plastisol or water-based ink, film positives | Screen printing frame with mesh, squeegee, UV exposure unit, flash dryer | Varies by layers | Professional results, technical | Custom apparel, multiple color designs |
| Pottery Painting Ideas | Bisque-fired pottery, underglazes, clear glaze | AMACO semi-moist underglaze pans, various brushes, pottery sponges | 30 minutes at 140°C for acrylics | Creative freedom | Personalized mugs, plates, vases |
| Cyanotype Photography Prints | Ferric ammonium citrate, Potassium ferricyanide, watercolor paper | Wide hake/foam brush, glass, UV light/sunlight | 10 minutes to 1 hour exposure; 1-3 days for full blue | Beginner-friendly with kits | Prussian blue photographic prints |
| Handmade Soap Bars | Goat’s milk soap base (melt-and-pour) or oils + lye (cold process) | Silicone molds, immersion blender, thermometer, safety gear | Varies; cold process requires curing | Melt-and-pour: easy; Cold process: chemistry knowledge | Custom scented soap bars, gifts |
| Watercolor Painting Techniques | 90lb or 140lb watercolor paper, watercolor paints, waterproof markers | Round brushes (sizes 4, 8, 12), two water jars, mixing palette | Quick drying | Most accessible, builds foundational skills | Paintings, art projects |
| Beaded Jewelry Designs | Glass, acrylic, wooden beads, stretch cord, clasps | Round-nose pliers, flat-nose pliers, wire cutters, beading needles | Quick assembly | All skill levels with kits | Charm bracelets, friendship bracelets, anklets |
| Decorative Wax Melts | Paraffin, soy, parasoy, or coconut wax, fragrance oils, wax dye chips | Silicone candy/clamshell molds, double boiler, thermometer | Pour at 55-65°C for soy; layering requires setting time | Beginner-friendly | Flameless home fragrance |
| Painted Succulent Planters | Terra cotta pots, milk paint or acrylic paint, clay pot sealer | Foam brushes, stiff brushes, sandpaper | Sealer and paint drying time | Easy painting techniques | Indoor garden decor, personalized planters |
| Upcycled Denim Projects | Old jeans in various shades, interfacing | Jeans needle (sizes 90-110), sharp fabric scissors, sewing supplies | Varies by project | Prevents fabric waste | Tote bags, storage pouches, cushion covers |
| Friendship Bracelet Patterns | Embroidery floss (32″ strands), masking tape/clipboard | Sharp scissors | Varies by complexity | Teaches knotting skills | Gifts for friends, wearable accessories |
| Punch Needle Plant Hangers | Oxford size 10 punch needle, rug yarn (180g each color), monk’s cloth | Stretcher bar frame (50x23cm), wide-eyed tapestry needle | Not mentioned | Beginner-friendly fabric | Functional wall decor with plants |
| Custom Mug Art | Ceramic mugs, oil-based paint pens or acrylic paint, Mod Podge | Cotton disks, degreaser, painter’s tape | 24 hours natural drying; 30-35 min baking at 325-350°F | Easy personalization | Personalized drinkware, gifts |
| Tassel Accessories | Yarn, embroidery floss, ribbon, or fabric strips | Scissors, darning needle, cardboard (winding board) | Quick assembly | Minimal supplies, fast | Keychains, earrings, bag charms |
| Pom Pom Keychains | Rainbow yarn, keychain clasps, jump rings | Pom pom maker set, sharp scissors | Quick assembly | Very easy with pom pom maker | Backpack accessories, keychain charms |
| Woven Tapestry Projects | Cotton tapestry warp, wool fibers (12ply), frame loom (30x45cm) | Tapestry fork, shed stick, blunt tapestry needles, scissors | Varies by size | Beginner-friendly with frame looms | Textured wall art, fiber art |
| Floral Paper Garlands | Text weight paper in various colors, green ribbon/twine | Sharp scissors/cutting machine, glue, craft needle with wide eye | Quick assembly; cut 15 of each design | Easy paper crafting | Room decoration, party decor, mantels |
| Easy Crochet for Teens | Medium weight worsted yarn, crochet hooks (I/5.5mm to L/8.00mm) | Aluminum/bamboo hooks, tapestry needle, stitch markers, scissors | Varies by project | Beginner-friendly with larger hooks | Scarves, beanies, bags, blankets |
Conclusion
Not every craft on this list will resonate with your teen, and that’s perfectly fine. I’ve found that teens gravitate toward projects matching their personal style and current interests. If something sparks their creativity, wonderful! Accordingly, they might spend hours perfecting that technique. The key is offering variety so they can discover what truly excites them. Mix and match projects based on their mood, available time, and skill level. Some will become favorite hobbies, while others remain one-time experiments. Overall, these crafts give teens creative outlets where they build skills, express themselves, and create items they genuinely love.
FAQs
Q1. What are some creative craft projects that teenagers will actually enjoy making? Teenagers often enjoy crafts that let them express their personal style and create functional items. Popular options include hydro dipping sneakers, making polymer clay jewelry, creating tie-dye fashion pieces, designing resin rings, and embroidering denim jackets. These projects produce professional-looking results that teens are proud to wear or display, making them more engaging than traditional kid crafts.
Q2. Which crafts are best for beginners with no special equipment? Air dry clay creations, friendship bracelets, and tie-dye projects are excellent for beginners since they require minimal equipment. Air dry clay needs no oven or kiln, friendship bracelets only require embroidery floss and scissors, and tie-dye kits come with everything needed to start. Watercolor painting is also very accessible, requiring just paper, paints, and brushes to create beautiful artwork.
Q3. What supplies do I need to start making beaded jewelry? To create beaded jewelry, you’ll need beads in various materials (glass, acrylic, or wooden), beading cord or stretch string, clasps and connectors, and basic tools like round-nose pliers, flat-nose pliers, and wire cutters. Beading needles help with stringing smaller seed beads. All-in-one jewelry kits are available that include everything needed along with step-by-step instructions, making them perfect for beginners.
Q4. How long does it take for resin rings to cure completely? Resin rings typically require 24 hours to cure fully after pouring. During this time, the resin hardens from a liquid state into a solid, durable piece of jewelry. It’s important not to disturb the molds during curing to ensure the rings set properly without bubbles or imperfections. The exact curing time can vary slightly depending on room temperature and humidity levels.
Q5. Can I safely paint candles without creating a fire hazard? Yes, you can safely paint candles by using melted colored wax from tealight candles as your “paint” rather than acrylic paint. This method is safe for burning since you’re applying wax to wax. Simply melt colored tealights, dip a fine-tipped brush in the melted wax, and paint your design quickly before it cools. If using acrylic paint for decorative-only candles, keep designs away from the wick and flame area.